Saturday, December 28, 2013

Spice "Rack" Reorganization (Non-Crafty)

I found myself with an entire week off from work between Christmas and New Year's without any travel plans (unused paid time off days are lost at the end of the year at my company).  I started to think of some home organization projects I could take on during those days.  You know..... the tedious, boring kind.  The kind that don't involve my craft room.  Funny how I could organize my crafty corner of our house until the cows come home, but when it comes to the garage, pantry, linen closets or even the cabinet where I keep our spices, I stiffen up and dig my feet into the ground.

Here is a picture of where we used to house our spices.  It's corner cabinet with a built in lazy susan, and it is difficult to find anything you are looking for without other items falling over.  Even if I purged some spices and cleaned out the cabinet, it still wouldn't be an optimal place for our spices.  I decided to move them to a large, wide drawer located left of our stove where we keep our (many) kitchen towels and take out menus.  The towels and menus would be moved to a smaller, deeper drawer and the items in that drawer will go where our spices were originally kept.  Are you following all of that?

I purchased Round Metal Tins from Papermart in the 8 ounce size.  Since the lids I purchased were solid and the new home for my spices is a drawer, I decided to make a label for the tops.  I found the round frame design online and used Powerpoint to insert the spice names in the middle of the frame.  I printed the spice label out on full sheet labels from Avery and cut the circles out using a Nestabilities circle die and my new Vagabond machine.

I made the decision to replace some of the spices we had with new ones. After searching online for spice shelf life, I found this basic guide:
  • Ground spices (nutmeg, cinnamon, turmeric): 2 to 3 years
  • Herbs (basil, oregano, parsley): 1 to 3 years
  • Seasoning blends: 1 to 2 years
  • Whole spices (cloves, peppercorns, cinnamon sticks): 4 years
  • Seeds: 4 years (except for poppy and sesame seeds; 2 years)
  • Extracts: 4 years (except for vanilla, which will last forever)
  • When it doubt, throw it out 
To help me with this in the future, I decided to place the expiration year on the bottom of each tin using Post-it adhesive roll (my new favorite thing). 

I'm not sure if this post was 100% 'non-crafty'.....but when I have to complete a task that isn't all that interesting, bringing office or craft supplies into the mix helps me carry on.

Sunday, December 15, 2013

Christmas Cards & Snow Clean Up

We began sending out our Christmas cards this week.  It took me a while to finish them and I truly hope I've made enough.  I created a few different versions of the same card in different colors.  The front of the envelopes are also stamped, and I love the way they turned out.

I used the Quatrefoil Die from Papertrey Ink on all of the cards.  This bad boy gave my Cuttlebug a run for it's money...so much, that I went out and purchased a Vagabond machine to save the muscles in my arms.  I just couldn't get the sandwich with the Cuttlebug to produce clean, crisp cuts with such an intricate die.  Holy cow, the Vagabond is a powerhouse, it showed that die who was boss!  I find myself die cutting much more now that I have it.  To make it easier to access and use I have it plugged in all the time.  Highly recommend.

Today was snow clean up in our area.  This is the third snow in one week.  I had a fight with the snow thrower on Tuesday and it won, so I decided today was my day off from snow removal.  Here is the view this morning from my craft room, it's Piper watching my husband remove the snow from the sidewalks and driveway.  Such a perfect spot for him to sit and watch!

Supplies Used:
Paper:  Spring MossHibiscus BurstVintage CreamScarlet JewelWhite
Stamps:  Holiday Photo FinishersHolly Jolly
Ink:  Scarlet JewelGarden Green, Rouge
Other  Photo Finish Strips DiesHolly Jolly DiesQuatrefoil Die

Friday, November 29, 2013

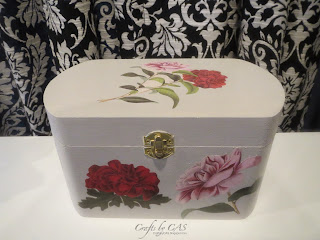
Decoupage Stationary Box


Amber over at Damask Love had a great post awhile back demonstrating a cute way to present a stationary set.  Like most of the posts that come from Amber, it inspired me!  I knew right away this would be a perfect type of gift for my MIL who never misses an occasion to send a card.  Here is my take on Amber's stationary kit.

I purchased some Ivory spray paint to color the unfinished pine box.  I used an ENTIRE can of spray paint and could still see though the paint to the grain, so I took another direction and brushed on some multipurpose craft paint.  I think the box probably needed to be primed first because the wood just sucked up the paint.  These types of crafts seem to take the longest for me to complete, where I can envision what I'd like the project to look like (thanks to Amber's blog) but just can't seem to get there.

The stationary box fits about 30 cards with envelopes.  Since I usually make multiples when creating cards, I have a stash of them to choose from which I tucked inside the box, covering a variety of occasions.  I decided to purchase my MIL a personalized address stamp from my favorite place The Stationery Studio and placed the stamper next to the cards.

Supplies Used:
Wood Box, Craft paint, Floral Cut OutsDecoupage Gloss FinishBrushes

Tuesday, November 26, 2013

Acorns

For a few days I've been trying to come up with something new to place in the apothecary jars which are on a tea cart in our foyer.  I asked my husband if there are any acorns we can gather in the area.  We live in a newer neighborhood without a lot of large trees, so searching the neighborhood or our own back yard wasn't going to work.  I let the nagging acorn thoughts leave my head for about a day when my DH came into my craft room and showed me a post on Facebook made by a mutual friend.  His caption: "28 bags of leaves and 1 bucket of acorns"!!!!!    SCORE!  One persons Saturday lawn chores turns into my craft projects for Fall!

I started by wiping the acorns with a damp cloth to remove the dirt, and set them on a foil lined baking tray.   As almost all of the acorns were separated from their tops, I made sure there were approximately the same amount of each.    I baked them in a 200 degree oven for two hours, gently shaking the trays every 30 minutes to prevent burning.    This helps remove moisture and any hidden bugs (which I had read about).   After cooling, I simply hot glued the tops to the acorns.

I plan to keep these for future decorating, so I may spray them with clear enamel before putting them away for the season.

Saturday, November 23, 2013

Gobble, Gobble - Thanksgiving Place Cards

I couldn't resist making more of the cute little turkeys from the card we recently sent out for Thanksgiving.  I knew those turkeys had to adorn our place cards this year.  As usual, I printed off the names for the cards using Word.  I'm just not crazy about my own handwriting and the fact that you can pretty much choose any font you like makes it so easy.

(I am using my iPhone to take photos while I look for a replacement camera..... hopefully they look alright)

Supplies Used:
Paper:  Dark ChocolateVintage CreamHarvest Gold
Stamps:  Gobble, Gobble
Ink:  Chocolate Chip
Other:  Dark Chocolate Felt, Harvest Gold Felt, Terracotta Tile FeltGobble, Gobble DieNestabilities Classic Rectangles LargeNestabilities Classic Scalloped Rectangles Large

Saturday, November 9, 2013

Craft Room Doors

I'd like to introduce you to the new entrance into my craft room!  I'm so excited - I've wanted glass doors for my room since we moved into our home 7 years ago.  Like most of our home projects, this was a result of another project we started.  I wasn't crazy about the shiny brass door hinges/hardware and prefer brushed nickel.  I went on a mission to change all 23 knobs and 57 hinges in the house.  That undertaking morphed into a thought "now is the perfect time to change my craft room door", which further morphed into changing the door leading to the basement to match the new craft room doors.  The official name for this phenomenon in our house is the "Snowball Effect"!  My next challenge is to keep my room clean now that I can't hide the mess behind a closed door.

Wednesday, November 6, 2013

Gobble, Gobble - Thanksgiving Cards

I started working backwards this year on my holiday card making.  I began creating my Christmas cards about a month before I even thought about Thanksgiving!  To be fair, we do send out about 100 more Christmas cards than Thanksgiving, but it still doesn't seem right.  Thanksgiving is important - at least in my eyes it is!

I couldn't resist using this really cute turkey from Papertrey Ink I picked up last week!  Instead of stamping his feathers on paper, I decided to use felt.  First I use the die and cut the base shape in Harvest Gold.  Next I cut petal shapes with the rest of the colors and use the base shape as a guide when adhering the 'feathers'.   He's just so stinking cute.  I must find away to incorporate this little guy in with other Thanksgiving creations such as the menu or place cards.

(Sorry about the quality of the photo, I believe it is time for a new camera)

Supplies Used:
Paper:  KraftTerracotta TileDark ChocolateVintage CreamHarvest Gold
Stamps:  Gobble, Gobble
Ink:  Chocolate ChipCrumb CakeTerracotta Tile
Other:  Dark Chocolate Felt, Harvest Gold Felt, Terracotta Tile Felt, Gobble, Gobble DieMat Stack 3 DieLayerz Mat Stack 3 DieMega Mat Stack 3 DieBountiful Banners Die

Saturday, October 19, 2013

Washi Tape From Japan


My DH was on a work trip in Tokyo, Japan this week and when he came home this evening he handed me a small bag with "MDays" written on it.   MDays is a stationary store located in a shopping mall that was near his hotel.  On his last day in Japan, he popped in the store to see what unique Japanese craft related items he could find to bring back for me.    And what an excellent surprise:  he brought me washi tape, how great is that?!   He picked up a cute selection of different patterns and widths.  To be honest, I don't have one roll of washi in my stashi!   Sure beats (another) Hard Rock Cafe shirt!

Sunday, September 22, 2013

Tulle Halloween Wreath - Revisited!!

I created this quick and simple black tulle wreath last Halloween to hang on the door that leads to our basement.  I decided to embellish the tulle wreath by adding some ghost Peeps - what else, of course!  Eeee !!!

Supplies Used:
8 inch green Styrofoam wreath form
Black duck tape
Black Tulle
Hot glue 
Ghost Peeps
Orange ribbon
Black bow

Sunday, September 15, 2013

Disneys Did Ya Know?!? (non-crafty)

Ok, I realize this isn't craft related, but recently, I have been getting more and more emails from my blog readers asking Disney World advice: where are the best places to eat in EPCOT, best time of year to visit, or any other well kept secrets.  Since my DH and I go a few times per year, we do have a few opinion on the matter, and thought this would be a nice place to share them.

Our favorite times of year to go are:
End of September through end of October - Specifically, anytime the week AFTER Food and Wine Festival in EPCOT begins.  The first weekend is just over crowded.  The beginning of September is usually a bit less crowded, but the weather might not be on your side.  We know this because we spent three days sequestered in our hotel waiting for Hurricane Frances to pass in September 2004.
May -  The crowds are a touch higher than in October, but still manageable.  The event happening in EPCOT at that time of year is the International Flower and Garden Festival.   In 2013 EPCOT started to take a page from their Food and Wine days and now they have booths set up with special food and drink offerings.  I recommend heading home before the Memorial Day weekend begins!

First half of December - The parks are all decorated for the holidays but the crowds are not as large as they definitely will be later in the month.  The weather is chillier than October or May.  We've never been to a hotel pool during this time and we tend to stay at a hotel with a 'warmer feel' - Animal Kingdom Lodge, Wilderness Lodge.

January -  We usually go for a long weekend in January, just to get away and put our faces in the sun.  The crowds are minimal!  Although this trip is usually only a few days for us, it is well worth it!  Temperature can be downright chilly or pleasantly warm.... it's a crapshoot.

One of my go-to sites for all things Disney is All Ears.  They have a great section under Planning which also details the best times to visit.

FOOD!
Tutto Gusto Wine Cellar for a quick sandwich or snack.  This place is only about a year old and they seem to still be working out their menus, but it's our go to place to get out of the heat and crowds.  It's located in EPCOT in the Italy pavilion.  It is mostly adults and the staff is very friendly.  Only downfall....cell phone service is very spotty.  I am quite fond of their sangria.

50's Prime Time Cafe (PT) is located in Hollywood Studios and serves comfort food that is over the top.  I will admit that we usually only eat IN the restaurant when we bring people to Disney World for the first time.  When it's just the two of us we always go to Tune-In Lounge (which is connected to PT) and sit at the bar and eat.  The bartenders (especially Dave, Alana, Julie and Enzo - they have all been working there for YEARS) are just the best!  Here's a little interesting thing I found a few years ago while strolling the internet looking for some tips and tricks for Disney World.  I discovered this blog and was reading about the Tune-In Lounge, and when I saw the picture at the end of their post.....IT WAS MY HUSBAND, OUR FRIENDS AND I sitting at the bar having a great old time.  Here's the LINK.  Ha!  How crazy is that?
 
If you're a foodie, here's a great blog: Disney Food Blog (they are on Twitter also)

I've mentioned before that my husband and I are Disney Vacation Club members.  The club gives us the ability to go to Disney (and other places) often.  We enjoy it.  There are hotels in Disney World which are designated as Vacation Club Resorts.  The rooms in the resorts a little different from regular rooms at Disney, as they are larger, have kitchens, and multiple bedrooms.  Here's the thing, you don't have to be a DVC member to book those rooms.  If you go to the Disney site, they are referred to as Deluxe Villas, check 'em out.

Just a few tips to start. There are a many others to share!   If you have specific topics you'd like me to touch on, comment below.

Friday, August 9, 2013

Ink, Ink & Even More Ink!

I just received my first shipment of ink from Stampin Up!  Something tells me I may have enough ink now.  I've been enabled.  I can't take full blame for the ink explosion that just slapped chaos on my craft room.  Christina has been showing videos this week on the Stampin Up! products and she lured me in.

Trying new ink is a pretty big step for me.  I've been a loyal and true Papertrey Ink girl since the beginning.  I love, love, love the weight of their cardstock but I haven't been so happy with the results from the inks lately.  I've been going back and forth trying to find ink colors that would coordinate well with  PTI's paper.  I placed my order on the 1st of August and it was at my door on the 8th!

I thought I'd show the 'chaos' part of this new found ink.  Here is where I currently house my ink pads in my 5 x 5 Expedit from IKEA.   Something tells me the 30 new ink pads are not going to fit in the same space.  I'm back to the constant battle of finding a home for new products (while still having my room feel 'pretty' and organized).  Maybe I should just move myself into a Michaels or a Hobby Lobby and take up residence.  Think they would mind?  Oh, they would have to be pet friendly, I'd need to bring my Yorkie with me!

While I started to unpack my lovelies, I decided I would make an ink swatch deck for myself.    I also came up with a cross-reference chart to match the different ink colors across the brands I use.    The chart is a work in progress as I add colors, but here it is so far.

Saturday, August 3, 2013

Enjoy Your Retirement

It's been awhile since I've been in my craft room creating new things.  Summer took so long to get here and yet it's coming to an end so quickly!  Is it flying by for you as well?

An Administrative Assistant at the company my husband works for is about to retire (lucky girl).  My husband spends most of his time at work on the "road" and she has been a huge help to him when it comes to travel arrangements.  He's really sorry to see her leave.  He asked me to make a card for him to tuck a little gift card in as a thank you.

I have been anxious to use the supplies I received in June from the Hero Arts Warehouse Sale.  All of the paper came from the card set.  I decided to turn the PTI Mat Stack 7 dies on their side so my sentiment could fit on the bottom of the largest layer.


Supplies Used:
Paper:  Floral Mixed Folded Cards
Stamps:  Scrolling ScriptOn the Links
Ink:  WisteriaVersaMark
Other:  Floral Mixed AccentsMat Stack 7 DiesWhite Embossing Powder

Saturday, June 29, 2013

God Bless America Card


I made two color versions of the same card to wish our family and friends a happy Fourth of July.  It sure took a long time for summer to get here and now it seems like it's flying by!


Supplies Used:
Paper - Pure PoppyEnchanted EveningWhite
Stamps - Red, White & Blue
Ink - Enchanted EveningLipstick Red
Other - Super Star Boarders DieLimitless Layers Circle Die, Ladybug red embossing powder (Martha Stewart)

Monday, June 17, 2013

S'mores in a Jar

I'm back with another 'in a jar recipe'.  I'm obsessed with finding desserts to serve in these cute little Ball Jars.  I've made pie, cheesecake and now S'mores!  Here's the recipe I used:

Ingredients:
2 cups graham cracker crumbs
3/4 cup butter, melted
1/4 cup sugar
1 3.4-ounce package instant chocolate pudding, prepared to package directions
1 1/2 cups marshmallow fluff
12 large marshmallows

Directions:
Preheat oven to 350°F. Add graham cracker crumbs, butter and sugar in a bowl and mix well together. Transfer crumb mixture to a foil lined baking sheet and press mixture into the bottom. Bake for 10-12 minutes or until lightly browned. Remove from oven and allow to cool then break into pieces.

Layer crumbled graham crackers, then a layer of pudding, then marshmallow fluff, repeating layers until ending with the pudding layer. Place 3 large marshmallows on top of the pudding, and broil on a top rack of the oven for 2-3 minutes or until tops begin to brown lightly. Serve immediately or at room temperature.

I think 3 marshmallows on the top was a bit too much, next time I'll only top it with one.


My DH is my official taste tester and so far, he liked this 'in the jar' recipe the best.  (He is a huge chocolate fan, so maybe that had something to do with it).

Wednesday, June 12, 2013

Hero Arts Warehouse Sale

Last week while reading Jennifer McGuire's blog I decided to head over to Hero Arts site and see what they have to offer.  See, I'm the kind of crafter who purchases 90% of my supplies online and very rarely deviate from the companies I buy from, but I thought I'd browse and see just what they have.  I noticed a section in their shop called Warehouse Sale and was enticed.  A 'mystery box'...YES!    Not a bad idea for someone just wanting to sample a little of what they had to offer.  I choose to order the $25 Accessories box of goodies.

My order arrived yesterday!  Just like the description said - it was filled with gems, flowers, buttons, patterned paper, stamps and ink!

Here's what was included:
20 sheets of 8 1/2 x 11 patterned paper
2 wood block stamps (100% Original and Enjoy the Moments)
2 Inks (Crushed Olive Distress Ink and Black Memories Dye Cube)
3 Fancy Felt Flowers (SpringSummer, Neutral)
2 Fancy Felt Buttons (Spring, Summer)
2 Art Buttons (Spring, Summer)
1 Flower Sequins
1 Floral Ribbon
2 3mm clear Gemstones
1 pack Gemstones
1/2 pack Floral envelopes
1/2 pack Floral cards
1/4 pack of Floral print flowers
1/2 pack of Floral mixed accents

That's a pretty great mystery box if you ask me.
I was hoping for a sample of their mid-tone inks, oh well.  I'll just have to order some to try them!

Saturday, June 1, 2013

Relax and Enjoy Your Day Postcard

I'm joining the fun over at Papertrey Ink and playing along with their Make It Monday challenge.  This week Ashley demonstrated stamping on photos and making them into postcards.

I choose a photo I took of my two favorite guys - my wonderful husband and my sweet Yorkshire Terrier, Piper.  We were in Ocean City, Maryland over the winter for my best friends wedding.  We go to OCMD every summer and during that time dogs are not allowed on the beach, but in the winter it's a different ball game.  One of the first things we did when we arrived was head right down to the beach and show that little peanut the ocean.  He wasn't impressed with the water, but loved walking around and meeting new people and other dogs (mostly the people).  This candid shot just makes my heart melt.

I like this new idea of stamping on photos and using them as postcards.  I think I'll try it some more.  I need to work on my stamping skills for the back of the cards though.  My lines are not very straight, but I'll work on that.  This challenge also made me want to add the Postmarks Stamp Set to my wish list.  Why does that always seems to happen?

Supplies Used:
Paper - Inkjet Photo
Stamps - Flipping OutDesktop File InspirationLimitless Labels
Ink - Dark ChocolateTrue Black
Other -

Thursday, May 30, 2013

No Bake Cheesecake in a Jar

We had a small cookout get together on Memorial Day and I made these desserts.  I love using these mini jars for desserts when the warmer weather comes.  I need to start finding more recipes to use these little cuties with!

I made two different toppings: blueberry and strawberry.  (Next time I make them I will try cherry using the recipe from my pies in a jar)

Blueberry Topping
1 cup fresh blueberries
3 tbsp granulated sugar
1 1/2 tsp cornstarch
2 tsp water
1/2 tsp fresh lemon juice
1/2 tsp zest of lemon

Combine the blueberries and sugar in a small saucepan over medium heat.  In a small bowl mix together the cornstarch and water until smooth.  Stir berries occasionally as they begin to release their juices.  Once mixture is bubbling, stir in cornstarch mixture.  Continue to cook, stirring frequently until the mixture thickens.  Remove from heat and stir in lemon juice and zest.  Transfer to a bowl.  Cover and refrigerate until ready to use.

Strawberry Topping
1 1/2 cups chopped strawberries
2 tbsp granulated sugar

Combine the strawberries and sugar in a bowl and toss to combine.  Let this stand for 1 hour, stirring a few times until the berries have released their juices.  Cover and refrigerate until ready to use.

Graham Cracker Base
3/4 cups graham cracker crumbs
1 tbsp granulated sugar
2 tbsp melted butter

Combine ingredients in a small bowl with a fork.  Spoon about 1 1/2 tbsp of mixture into the jar and push down with a spoon (I used the handle to my lemon juicer)

Cheesecake
8 oz cream cheese
2 cups low-fat Greek yogurt
1 1/2 cups confectioners' sugar, sifted
1 tsp vanilla
1 tbsp  heavy cream

Combine the cream cheese and Greek yogurt in a bowl.  Beat the mixture on medium-high speed until smooth, about 1-2 minutes.  Add in the confectioners' sugar and mix until well incorporated.  Add in vanilla and heavy cream, beat until fluffy.   Spoon the mixture into jars.  Spoon topping onto cheesecake mixture.

Refrigerate until ready to eat

Makes 12 mini jar cheesecakes

I cut mini stars from packaged Pillsbury pie dough and baked them until golden brown on a cookie sheet  (next time I will sprinkle with sugar prior to baking) and placed them on top right before serving.

Yum!!

Sunday, May 19, 2013

Christening Card

We are attending a christening for my cousin's baby girl at the end of the month, so I made a card for her special day!

Supplies Used:
Paper - White, Vintage CreamWhite Shimmer
Stamps - Cross Set
Ink - Watermark
Other - Banners Die, Cross Die, Gold Embossing Powder

Monday, April 29, 2013

Mother's Day Card

Here's the card I made to give to my MIL for Mother's Day.
Supplies Used:
Paper - Sweet Blush, Hibiscus BurstRaspberry Fizz, Spring Moss
Stamps - The Sweet Life, Holiday Photo Finishers, Framed
Ink - Hibiscus Burst, Raspberry Fizz, Spring Moss, Ripe Avocado
Other - The Sweet Life Die, Photo Finish Strips Die, Jewel

Since our schedules were not able to match up, we celebrated Mother's Day with her this past Sunday.  We took her to the Hotel Bethlehem for brunch, which is about an hour or so from us.  This hotel dates back to the 1920's and they boast about restoring it back to its 'grandeur'.  Our internal Disney soul kept thinking the hotel was taking a page from the Disney's Hollywood Studios ride - Tower of Terror.  Yes, the food was good, service was fine, but we couldn't get past the Bellmen's uniform (which looked exactly like the ToT uniform) and the infamous elevator that would "drop you to your death" - bwah ha ha ha.

Sunday, April 21, 2013

Gypsy Woes


THIS, my friends, is the error message I received trying to update the firmware on my Cricut Gypsy!  It all started when Cricut Support sent out an email last week announcing "Gypsy Linking" is now possible between the Cricut Gypsy device and the Cricut Craft Room design software.  Sounds great, right?!  Three simple steps is what the email stated.  I had to add a few more steps because I have a relatively new computer and needed to downloaded the latest Cricut Sync and Cricut Craft Room software.  No problem!  Once I began the process of updating my Gypsy's firmware, that's where the fun began!  About four hours later and multiple attempts, I now have a plastic brick!  Of course, this occurred on Saturday and their Customer Service is only open Monday through Friday.

The thing that is most frustrating to me is that error message!!!  Grrrr!!!  I have owned my Gypsy since 2009, when it first came out.  I actually pre-ordered it from HSN  before it was available to the general public.  Clearly the error message displayed is completely and totally false.   This Gypsy hasn't been touched EVER by anyone but myself and I own all 110+ cartridges that are linked on this machine.

Even if I did purchase another unit and was able to download all of my cartridges again (which I assume is highly unlikely, since cartridges can only ever be loaded to a single Gypsy), I have many project files which I created and have been working with..... which as of now are lost.   From what I have seen on the message boards, some people have partially fixed their "security breach" issue with a reformat of the Gypsy.  However, aside from all project files again being lost with a reformat, not all cartridges were restored either for those people.  I view myself as rather tech savvy, and have to say that I continue to be disappointed with Cricut Sync software.   Wish me luck!!


Monday, March 25, 2013

All Things Easter

I was going make a separate post for each item I was creating in prep for our family Easter dinner, but decided to lump it all together in one post.  I'm afraid all my holiday posts are starting to look the same!

As usual, we are happily hosting both our families for dinner - confirmed for five, tentative and prepping for nine.

Place cards are a must for our holiday meals, it helps me out with planning and it shows everyone where they are sitting when the crowd comes into the dining room all at once.  I chose that cute little bunny die from Papertrey to adorn each card.  I'm also happy to be using the pom pom supply from Christmas.  I don't even think I'm through a quarter of the way through my supply yet.  Since I'm not very happy with my own handwriting, I tend to rely on my computer to help me in that area.  I have a template all set up in Power Point for the 2-3/4 inch by 1-1/4 inch name cards.  Just a quick change of font each time if needed, and I'm ready to go!  I've attempted a few times to begin a new file in PhotoShop Elements, but I'm just not fast enough yet to whip something out from scratch on that program.

Last year I made a wreath using Peeps and loved the idea enough to do it again.  I choose purple and yellow this time.  In between each 'Peep section' I placed paper flowers that I cut using my Cricut to fill the gaps.  I love these colors together, but I like the way last years turned out much better;  I think it's because I decided to go with a smaller wreath form this year.  I like the spacing and placement of the larger wreath form.

Here are some little baskets I made using the Favor It Box 9 die from Papertrey Ink.  My sister loves old shaker boxes, so I thought of her when I saw this die.  I filled each one with Easter grass and some goodies.  I used the same colors as each persons place card and added their initial to the basket.

A few (probably 10) years back Martha Stewart had an online store, Martha by Mail.  I loved everything in her catalog - this was pre-Macy's.  That is where I found these plastic sugar/butter molds.  There are really cute Spring and Easter themed shapes in the set.  The sugar shapes could be made in advance.  Here's a link from Martha's site on how to make the sugar.  I added a drop of food coloring to some of the shapes to add a touch of color.

For dessert I'll be making a Banana Pudding recipe I saw on an episode of America's Test Kitchen. (I was going to post the link, but Cook's Country require you to register prior to viewing any recipe - sort of annoying...didn't want to annoy anyone.  You can find it by searching "cooks country banana pudding").  I have made this recipe before using the traditional trifle bowl and it was delish.  This year I decide to go mini and individual.  I found these glasses at Ikea a few weeks ago and thought they were perfect.  I'll use them again for sure!   I will edit this post after Easter with pictures of the dessert.

Happy Easter!

Saturday, March 23, 2013

Sending Hugs Across The Miles

I finally found time to join in again for a Make It Monday over at Papertrey.  This week Heather showed us how to create inked backgrounds.  I chose to create a colorful card and started by first embossing the background, followed by using a mixture of purple inks.  After I was finished inking, I spritzed some water mixed with Perfect Pearls to add some sparkle.

(As I am typing this post, my mailman just rang the door bell with my newest order from Papertrey....begin happy dance!!)

Supplies Used:
Paper - Royal Velvet, White
Stamps - Fancy FlourishesEveryday Photo Finishers
Ink - Royal Velvet, Winter Wisteria, Plum Pudding
Other - Perfect Pearls, Clear Embossing PowderDouble Ended Banners Die

Saturday, March 16, 2013

Easter Card

Here is the Easter card we will be sending out to our family and friends this year.  I adore the little bunny in the new Polka Dot Parade stamp set from Papertrey Ink.

Leftover pom poms from the tops of my snowmen gift tags (here) were prefect for the little bunny's tail!

Supplies Used:
Paper - Lemon Tart , Spring Rain, Winter Wisteria Bitty Dot, Hibiscus Burst
Stamps - Polka Dot ParadeEgg Hunt
Ink - Raspberry Fizz
Other - Polka Dot Parade die, Jewels

Monday, February 25, 2013

February Papertrey Ink Blog Hop

Nichole over at Papertrey Ink is hosting her regular monthly Blog Hop.  February is my first time joining in with the fun.

This month the theme is Marvelous Monograms.  I love, love, love anything with a monogram and enjoy giving monogrammed stationary (here, here and here).  As soon as I saw the blog hop theme, I knew I was going to make something for ME!  I like to have blank stationary on hand to write a quick hello or for use as a thank you note.  A note card with a monogram just makes it more special...three little letters that are all your own.   I also love that my initials can be sounded out into a word.
Supplies Used:
Ink - Versamark