Friday, November 29, 2013

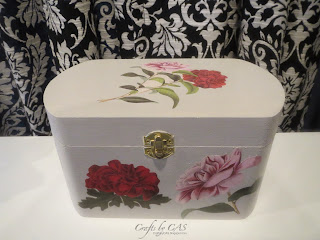
Decoupage Stationary Box


Amber over at Damask Love had a great post awhile back demonstrating a cute way to present a stationary set.  Like most of the posts that come from Amber, it inspired me!  I knew right away this would be a perfect type of gift for my MIL who never misses an occasion to send a card.  Here is my take on Amber's stationary kit.

I purchased some Ivory spray paint to color the unfinished pine box.  I used an ENTIRE can of spray paint and could still see though the paint to the grain, so I took another direction and brushed on some multipurpose craft paint.  I think the box probably needed to be primed first because the wood just sucked up the paint.  These types of crafts seem to take the longest for me to complete, where I can envision what I'd like the project to look like (thanks to Amber's blog) but just can't seem to get there.

The stationary box fits about 30 cards with envelopes.  Since I usually make multiples when creating cards, I have a stash of them to choose from which I tucked inside the box, covering a variety of occasions.  I decided to purchase my MIL a personalized address stamp from my favorite place The Stationery Studio and placed the stamper next to the cards.

Supplies Used:
Wood Box, Craft paint, Floral Cut OutsDecoupage Gloss FinishBrushes

Tuesday, November 26, 2013

Acorns

For a few days I've been trying to come up with something new to place in the apothecary jars which are on a tea cart in our foyer.  I asked my husband if there are any acorns we can gather in the area.  We live in a newer neighborhood without a lot of large trees, so searching the neighborhood or our own back yard wasn't going to work.  I let the nagging acorn thoughts leave my head for about a day when my DH came into my craft room and showed me a post on Facebook made by a mutual friend.  His caption: "28 bags of leaves and 1 bucket of acorns"!!!!!    SCORE!  One persons Saturday lawn chores turns into my craft projects for Fall!

I started by wiping the acorns with a damp cloth to remove the dirt, and set them on a foil lined baking tray.   As almost all of the acorns were separated from their tops, I made sure there were approximately the same amount of each.    I baked them in a 200 degree oven for two hours, gently shaking the trays every 30 minutes to prevent burning.    This helps remove moisture and any hidden bugs (which I had read about).   After cooling, I simply hot glued the tops to the acorns.

I plan to keep these for future decorating, so I may spray them with clear enamel before putting them away for the season.

Saturday, November 23, 2013

Gobble, Gobble - Thanksgiving Place Cards

I couldn't resist making more of the cute little turkeys from the card we recently sent out for Thanksgiving.  I knew those turkeys had to adorn our place cards this year.  As usual, I printed off the names for the cards using Word.  I'm just not crazy about my own handwriting and the fact that you can pretty much choose any font you like makes it so easy.

(I am using my iPhone to take photos while I look for a replacement camera..... hopefully they look alright)

Supplies Used:
Paper:  Dark ChocolateVintage CreamHarvest Gold
Stamps:  Gobble, Gobble
Ink:  Chocolate Chip
Other:  Dark Chocolate Felt, Harvest Gold Felt, Terracotta Tile FeltGobble, Gobble DieNestabilities Classic Rectangles LargeNestabilities Classic Scalloped Rectangles Large

Saturday, November 9, 2013

Craft Room Doors

I'd like to introduce you to the new entrance into my craft room!  I'm so excited - I've wanted glass doors for my room since we moved into our home 7 years ago.  Like most of our home projects, this was a result of another project we started.  I wasn't crazy about the shiny brass door hinges/hardware and prefer brushed nickel.  I went on a mission to change all 23 knobs and 57 hinges in the house.  That undertaking morphed into a thought "now is the perfect time to change my craft room door", which further morphed into changing the door leading to the basement to match the new craft room doors.  The official name for this phenomenon in our house is the "Snowball Effect"!  My next challenge is to keep my room clean now that I can't hide the mess behind a closed door.

Wednesday, November 6, 2013

Gobble, Gobble - Thanksgiving Cards

I started working backwards this year on my holiday card making.  I began creating my Christmas cards about a month before I even thought about Thanksgiving!  To be fair, we do send out about 100 more Christmas cards than Thanksgiving, but it still doesn't seem right.  Thanksgiving is important - at least in my eyes it is!

I couldn't resist using this really cute turkey from Papertrey Ink I picked up last week!  Instead of stamping his feathers on paper, I decided to use felt.  First I use the die and cut the base shape in Harvest Gold.  Next I cut petal shapes with the rest of the colors and use the base shape as a guide when adhering the 'feathers'.   He's just so stinking cute.  I must find away to incorporate this little guy in with other Thanksgiving creations such as the menu or place cards.

(Sorry about the quality of the photo, I believe it is time for a new camera)

Supplies Used:
Paper:  KraftTerracotta TileDark ChocolateVintage CreamHarvest Gold
Stamps:  Gobble, Gobble
Ink:  Chocolate ChipCrumb CakeTerracotta Tile
Other:  Dark Chocolate Felt, Harvest Gold Felt, Terracotta Tile Felt, Gobble, Gobble DieMat Stack 3 DieLayerz Mat Stack 3 DieMega Mat Stack 3 DieBountiful Banners Die